The Raspberry Pi is an ideal platform for experimenting with inertial measurement units (IMUs). These IMUs are usually I²C devices, so it is straightforward to access them using the Raspberry Pi's I²C bus. The integrated 3D graphics on the Raspberry Pi are useful for visualizing the results.
I have made some software that allows you to connect the MinIMU-9 v2 from Pololu Robotics & Electronics to your Raspberry Pi and calculate the orientation of the IMU. I also wrote a visualization program that shows the results in 3D. Check out the demo in this video:
The software is open source and I have written a tutorial for it. The only items needed besides your Raspberry Pi setup are:
- A MinIMU-9 v2 from Pololu, or the older MinIMU-9.
- Four female-female jumper wires.
Soldering is required: the male header pins that come with the MinIMU-9 v2 need to be soldered in.
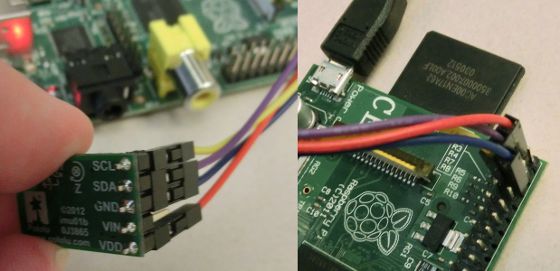
The MinIMU-9 v2 can be conveniently powered from the Raspberry Pi's 3V3 power line. The photos below show how to connect a MinIMU-9 v2 to a Raspberry Pi:

The software consists mainly of two programs, both written in C++. The minimu9-ahrs program reads data from the MinIMU-9's sensors via I²C, calculates the orientation of the IMU, and outputs data to the standard output. Internally, it represents the orientation with a quaternion, but several different output options are available: direction cosine matrix, quaternion, euler angles, and raw sensor data. The ahrs-visualizer program reads direction cosine matrix data from its standard input and displays a 3D representation of the MinIMU-9 v2 using OpenGL. I also used libi2c, libpng, the Boost program_options library, and Eigen. There is a Python script that helps calibrate the magnetometer. For easy installation of the software, I have created Debian packages.
For more information, see the tutorial! I would love to see what people build with this, so please post comments below!