Sunday, April 21, 2013

Unusable UI caused by the Windows Forms Anchor property and window size restrictions

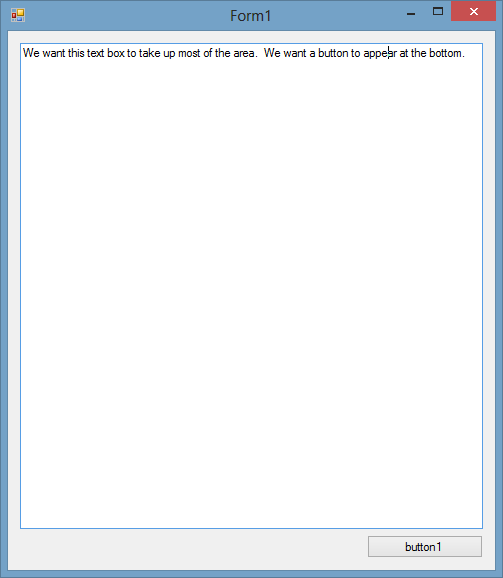
Suppose you make a Windows desktop application using Visual Studio 2012 Express for Desktop and you want to have a resizable window with a textbox that takes up most of the space and a button at the bottom of the window, as shown below:

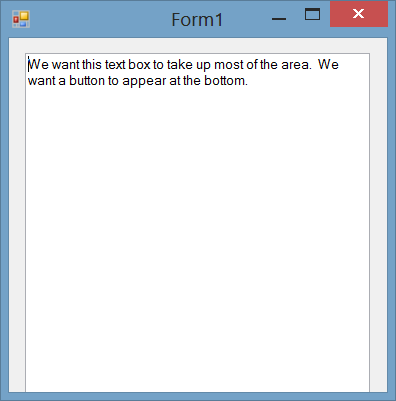
There are several ways to do this, but if you are not careful then a flaw in Windows Forms will cause some of your users to see an unusable UI where the button is missing, as shown below:

In this post I will document the flaw in Windows Forms and why it happens.

Here are the steps for reproducing the flaw:

  1. In the Control Panel, change the DPI setting to 100%. You can find this under Control Panel > Appearance and Personalization > Display > Change the size of all items, but you can get there faster if you just press the Windows key, type "dpi", and then do the proper keystrokes after that. If you are in Windows 8, you will need to select "Settings" after typing "dpi".
  2. In Visual Studio 2012 Express for Desktop, create a new Windows Forms Application. I used Visual C# but I expect the problem to happen in Visual C++ and Visual Basic too.
  3. Create a Button and position it in the lower-right corner of the form. Set the Anchor property of the button so that it anchors to the bottom and the right. This means that when the Window is resized, the button will move in order to keep two distances constant: the distance between the button's right edge and the window's right edge, and the distance between the button's bottom edge and the window's bottom edge.
  4. Optional: Create a TextBox that takes up the rest of the space on the forum. You will need to set its Multiline property to true, and set its Anchor property so that it anchors on all four sides. It will resize with the window.
  5. Resize the form so that it the form's height is about 100 pixels less than the height of your screen.
  6. Run the project and verify that everything behaves as expected. The entire textbox and button should be visible no matter how you resize the window.
  7. In the Control Panel again, change the DPI setting to 125%. You will have to log off for the change to take affect. You should notice that everything on your desktop appears bigger than it was before.
  8. Run the program that you built earlier. You should probably just find the executable that was built and run that directly instead of starting Visual Studio. The button will be missing.

So what is happening here? There are three features of .NET that are trying to adjust your window:

  1. Anchoring: The anchoring you set for you controls is trying to make certain distances constant. This is probably done in a SizeChanged event handler or something on the form.
  2. Auto-scaling: At startup, when this.ResumeLayout(false); is called in the InitializeComponent method, the Auto-scaling feature detects that the form was designed on a system with a different font size than the system on which the program is now running. This will resize the form and the things inside it.
  3. Window size limiting: Windows Forms does not let you have a window that is taller or wider than the user's screen.

It seems to me like the anchoring and auto-scaling work well together. At startup, the auto-scaling increases your window size to account for the larger font on the user's computer, and expands the window and controls appropriately. However, when the window size limiting procedure runs, it notices that your window is taller than the screen, so it changes the height of the window. Unfortunately, something must be wrong because the anchoring rules do not get applied when the height is decreased. This leaves your button and part of the text box invisible because they are below the bottom edge of the form. This all happens when your application starts up and resizing the window afterward does not help.

This really seems like a bug in the .NET Framework's Windows Forms, and I hope that Microsoft will fix it in the next version. I cannot think of a reason why they would want the anchoring rules to not be applied after the window size limitations are applied.

I tested this at 150% DPI and the problem did not happen.

Summary of the flaw

At startup, if your Windows form gets expanded by auto-scaling to size larger than the user's screen, it will get resized to fit on the screen. Unfortunately, the anchoring rules are not applied after that last resize. If your window's height got decreased, then any elements that were anchored directly to the bottom of the form will have incorrect coordinates. If your window's width got decreased, than any elements anchored directly to the right side of the form will have incorrect coordinates.

Workarounds

Smaller form: The simplest workaround is to make your form smaller. Let's suppose that the smallest monitor size you want to support is 1024x768. If we assume that the largest DPI setting where this problem occurs is 125%, then we can divide those dimensions by 1.25 to get 819x614. Your form needs to be smaller than 819x614 when displayed at normal DPI. Note that this is just the initial, default size of the form; the user can resize it after the application has started if they want to.

Avoid anchoring elements directly to the form: One workaround is to make a Panel and set its Dock property to Fill. Put all your elements inside the panel instead of directly on the form. I tested this and it worked. I think that the docking must be done in a better way than anchoring, so the panel is able to receive some event about its size getting reduced, and correctly apply the anchoring rules to its children.

You can download the Visual Studio projects I used to investigate this here: anchoring.zip. AnchorTest is the one with the bug and AnchorFix is the improved one with a docked panel.

Other flaws related to anchoring

I suspect that there are more problems with anchoring. Here is a list of the ones I have heard of. Are there any more?

  • I have heard that anchoring does not work correctly with Visual Inheritance, which means having a Form or Control that is a subclass of another. See Roland Weigelt's blog post from 2003.

Conclusion

This is a pretty rare problem that is unlikely to affect many users. Most people that have small monitor resolutions should really just use the default DPI setting of 100%. Most people who use a non-standard DPI setting should have enough resolution so that the window size limiting does not happen at startup. If you cannot wait for Microsoft to fix this, there are some workarounds you can use.

Saturday, April 20, 2013

Git and PuTTY in Windows

Git is a very useful tool for keeping track of different versions of files as you make changes to them. In this post, I will talk about how I prefer to install Git in Windows, and how Git is integrated with PuTTY, my SSH-client.

First of all, I like to install git in C:\git instead of in "Program Files" so that the path has no spaces. Git comes with lots of Unix utilities such as diff and grep. Lots of Unix utilities were developed in an environment where it was highly unusual for a path to have spaces in it. As a result, when these utilities are ported to Windows, some of them have trouble when they encounter spaces in a path. I am not saying that the utilities included with Git necessarily have this problem, but maybe some other Unix utilities on your computer will get screwed up by the presence of the Git Unix utilities on the path. This is not just an academic concern: it actually happened to me and caused problems for our customers. See this bug report I filed to the GNU make maintainers. On the other hand, you should install Git in the default location if you plan on redistributing any Unix utilities to your customers; it's better that you should be the first person to experience the bugs in those utilities, rather than your customers.

I mostly just installed the default components of git, except that I chose the fancy git-cheetah plugin instead of the simple menus. This means that when I right-click on a folder or file in Windows, I will see some git commands available in the menu, and there will be different commands depending on whether I am in a git repository or not.

Git gives you three options for how it will adjust your PATH environment variable. The PATH is a list of directories that contain executables you might want to run from a command line. I chose the third option, which is the most invasive, because I occasionally need to use the plain old Command Prompt (instead of Git Bash), and when I do that I want to have access to useful utilities like grep and GNU find. I have not tested this option for very long though, so if you want to be careful you should pick the middle option. (Just because the middle option mentions cygwin it doesn't mean you have to use cygwin.)

I think the options on the line-ending conversion setup screen above are pretty self-explanatory. You just need to understand that there is this long history of Windows applications using two bytes (0x0D, 0x0A) to indicate a new line in ASCII text, while Unix applications use just one byte (0x0A). I always chose the first option and it has not caused me any problems.

Git can establish secure connections to remote git repositories using SSH. The git client thankfully does not implement all the details of SSH key management and profile configuration; instead it lets you choose another program to do that work. The default option is to use the version of OpenSSH (ssh.exe) that comes with Git. I choose the other option, which is to use PLink. I will talk more about this below.

After installing Git, you should configure what editor you want to use for commit messages. I usually specify commit messages on the command line with the -m option, but sometimes I just need to use an editor. For example, if you want to write a very long commit message or you want to amend a commit without changing the message, the editor is pretty useful. I like Notepad++, so I just run the following command to configure git to use Notepad++. The -alwaysOnTop option is used so that I do not get too distracted in the middle of writing my commit message!

git config --global core.editor "'C:/Program Files (x86)/Notepad++/notepad++.exe' -multiInst -notabbar -nosession -noPlugin -alwaysOnTop"

Exploring Git Gui

If you are going to spend a lot of time with git, I recommend using Git Bash and being familiar with the command-line options for Git. It will help in the long run. However, you might also find it useful to use the included GUI. Here is the context menu you get when you right-click on a file or folder in a git repository, thanks to the git-cheetah plugin:

The only difference between the Git Commit Tool and the Git Gui is that the commit tool closes after you make a commit, and it has a lot fewer features because it just for making commits. Besides the context menu, you can also access either tool from the command line by typing git gui or git citool. This is what the Git Gui looks like:

[picture]

Here is what the Git History screen looks like. I did some editing so you can see three of the right-click context menus that are available on this screen:

[picture]

Git Gui versus TortoiseGit

There are many options for GUIs to use with git. I have used TortoiseGit (and Tortoise SVN before that) for many years. TortoiseGit does have a very nice interface for showing the history of your git repository, but I find that interface to be buggy and slow at times. If you change one of the checkboxes at the bottom while the window is open, is it not uncommon for that operation to take 5-15 seconds. When that operation is done, it is not uncommon for the lines drawn between the commits to be incorrect.

TortoiseGit does have a nice shell extension for Windows that puts icon overlays on your files to indicate which ones have changed in git. However, I cannot trust those icons anymore because they have too often been incorrect in my experience. For example, I will see that some folder has a red icon indicating that it has changed, but then I run "git diff" and see that in fact nothing has changed. On top of that, I have occasionally experienced even weirder problems in Windows Explorer that I suspect might be the fault of TortoiseGit.

TortoiseGit and Git Gui have a different approach to UI design. In TortoiseGit, the center of your experience will be a really long sub-menu of right-click context menu. It contains about 25 different operations you might want to perform. Actually, I move the most-common operations up one level in the menu structure so I don't have to go into that large menu too often. With Git Gui, the center of your experience will be the Git Gui window.

I have barely used Git Gui at all, but my impression is that it is faster and less buggy than TortoiseGit. Once I get used to it, I think my productivity will increase.

Side note: One downside of Git Gui is that the people who named it used the incorrect capitalization of the acronym GUI. When you write a blog post about Git Gui you might look dumb no matter which capitalization you choose to use.

How Git works with PuTTY

I find it interesting to explore how git uses PuTTY to take care of your SSH connections. Also, you might need this information some day if you are debugging your git SSH connection. Here is the block diagram of what happens when you type "git fetch":

The boxes represent executable processes that are running during the fetch operation, and the arrows represent the flow of information. When you type git fetch in bash or some other shell, your shell will spawn a new git process and let you see the characters it outputs on the standard output. The git process will check the $GIT_SSH environment variable, which tells it which SSH client to use. In my case, I want $GIT_SSH to be "C:\Program Files (x86)\PuTTY\plink.exe" so that git uses the plink.exe which comes with PuTTY. Git spawns a new plink process with two arguments. The first argument is the remote host name or PuTTY session name. The second argument is a command to run on the remote machine. Git will take over the standard input and standard output of the plink process, but the error output from plink is usefully redirected to your shell. After plink establishes a connection to the remote machine, the SSH daemon (sshd) on the remote machine will run that command. (Actually, it might run it indirectly through a shell like bash.) The command will be something like "git-upload-pack '/path/to/repo'". This starts a new git process on the remote machine and tells it the path of the repository to look at. At this point there is a git process running on your machine and one running on the remote machine. They coordinate in some smart way and figure out what data needs to be fetched to your machine.

Here is a fun shell session that I used to figure out this stuff. The name "davidegrayson" is the name of a PuTTY session that establishes an SSH connection to my web server. The directory '/home/public/' holds a git repo for my website. In the last command, you can see a little sampling of the protocol that the two git processes use to talk to eachother.

This was kind of a random post but I hope you will find it useful! At least I will find it useful the next time I am installing Git in Windows!