Sunday, January 13, 2013

Ruby 2.0: Helpers should be refinements

In Ruby, people sometimes make modules called "helpers" that define some useful methods:


module MyHelper
  def add(a,b)
    a + b
  end
end

If you include the module in a class, you can call the helper methods easily without any kind of prefix:


class MyClass
  include MyHelper

  def join(str1, str2)
    add str1, str2
  end
end

puts MyClass.new.join("a", "b")   # => "ab"

However, I think this has bad semantics. Look at the output below and think about why it is bad:


puts MyClass.new.is_a?(MyHelper)  # => true
puts MyClass.new.add(4, 3)        # => 7

The fact that MyClass uses methods from MyHelper should be an internal implementation detail, but that information is leaking out to the users of MyClass in all kinds of ways.

The Ruby is_a? function returns true, telling you that an instance of MyClass is a MyHelper. However, if you design a structure like this, it is more likely that your mental model is that an instance uses the helper to accomplish its tasks without being a helper.

There are two more practical problems with this setup. First, people are free to call the helper method #add on instances of MyClass. That does not make any sense, so we should design our code to disallow that. Second, the #add method would show up in the list of methods returned by MyClass.new.methods; calling #methods in IRB is a super useful way to look for features of an unfamiliar class, and our setup makes that harder because #methods will return lots of junk. An easy way to fix these two problems is to add a new line that says private at the top of the module, but I think that is not as good as the solution I propose below.

Refinements

In Ruby 2.0, the language was expanded to include refinements. If you have not heard of refinements, Google it now. However, beware that Module#using was recently removed so nearly all of the examples you will find are wrong. You can mostly only call using from the top level of a Ruby file.

Refinements were mainly intended to make monkey-patching safer, but I believe they can also greatly improve the way we use helpers. The Object class is the parent class of (almost) every Ruby object, so if we refine it with some helper methods, those methods will be available on every object, including self. This means we can call them easily without any kind of prefix:


module MyHelper
  refine Object do
    def add(a, b)
      a + b
    end
  end
end

using MyHelper

class MyClass
  def join(str1, str2)
    add str1, str2
  end
end

puts MyClass.new.join("f", "g")      # => "fg"
puts MyClass.new.is_a?(MyHelper)     # => false
puts MyClass.new.respond_to?(:add)   # => false
puts MyClass.new.add(4, 5)   # throws NoMethodError if line
                             # is in a different file

As you can see above, by making a few easy changes to the helper and the code that uses it, we are able to fix all of the semantic problems we were having earlier. This is nice, except for one caveat which I will get to later.

Changing a helper module into a refinement

We had to add two lines of code to MyHelper to use it as a refinement. What if you do not want to edit the original module? Maybe the module is part of a third-party library or maybe you are not ready to refactor all the code that uses the module. The following works:


module MyRefinement
  refine Object do
    include MyHelper
  end
end

Generally, including a module with include is equivalent to defining some functions in the same place, and that continues to be true with refinements. This makes me happy.

Making it even better, maybe

Refining Object is troublesome because the code that uses the helper would be allowed to call helper methods on random objects. Again, this does not make sense so our code should disallow it:


44.add(4, 5)  # => 9

Maybe this is OK if you are the only one writing code that uses your helpers, but if you are writing a system or framework that involves helpers, it would be so much nicer to just refine the class that actually uses the helpers. We can do that, as shown below, but it gets a little messy because of the limitations of the Ruby language:


# This method is defined once per project.
def helper(mod, in_class: Object)
  Module.new do
    refine in_class do
      include mod
    end
  end
end

# This is a helper module.
module MyHelper
  def add(a,b)
    a + b
  end
end

# This is how you write code to use the helper module:
class MyClass; end
using helper MyHelper, in_class: MyClass

class MyClass
  def join(str1, str2)
    add str1, str2
  end
end

puts MyClass.new.join("a", "b")  # => "ab"

Unfortunately, I think this is the best we can do if we don't want to refine the Object class. If anyone—especially Ruby language designers—has an idea of how to clean this up, let me know! I will put all of my failed ideas here.

I think we are very close to having a great new use for refinements, but maybe we need a new feature or two in the language to make it feasible.

Note: refinements are experimental, and the behavior may change in future versions of Ruby! This article was based on ruby 2.0.0dev (2013-01-07 trunk 38733) [x86_64-linux], also known as ruby 2.0.0-rc1.
Monday, January 7, 2013

Practical Windows Code and Driver Signing

I recently wrote a 7000-word document that should contain everything most developers need to know about Microsoft Windows code and driver signing. You can find it on my website: Practical Windows Code and Driver Signing.

Wednesday, December 19, 2012

Fresh & Easy receipt printer test

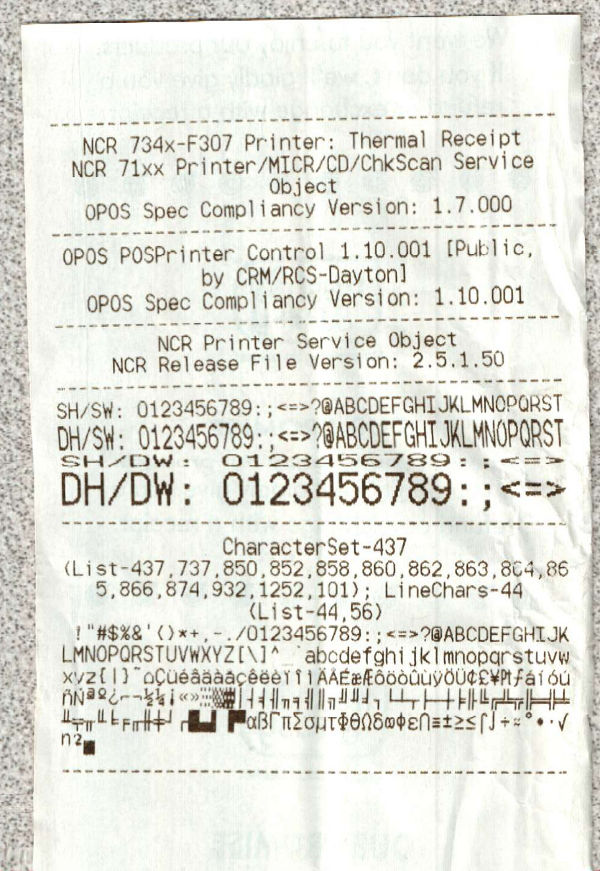
Look what I found hanging out of the receipt printer at the self-service checkout at Fresh & Easy (grocery store) the other day:

Some of the screwiness of this image is due to my handheld scanner. The actual receipt was not printed crookedly.

Here's a transcript so people can find this by searching on Google:

--------------------------------------------
   NCR 734x-F307 Printer: Thermal Receipt   
  NCR 71xx Printer/MICR/CD/ChkScan Service
                   Object
   OPOS Spec Compliancy Version: 1.7.000
--------------------------------------------
 OPOS POSPrinter Control 1.10.001 [Public,
             by CRM/RCS-Dayton]
   OPOS Spec Compliancy Version: 1.10.001
--------------------------------------------
         NCR Printer Service Object
     NCR Release File Version: 2.5.1.50
--------------------------------------------
SH/SW: 0123456789:;<=>?@ABCDEFGHIJKLMNOPQRST
DH/SW: 0123456789:;<=>?@ABCDEFGHIJKLMNOPQRST
SH/DW: 0123456789:;<=>
DH/DW: 0123456789:;<=>
--------------------------------------------
              CharacterSet-437
(List-437,737,850,852,858,860,862,863,864,86
   5,866,874,932,1252,101); LineChars-44
                (List-44,56)
 !"#$%&'()*+,-./0123456789:;<=>?@ABCDEFGHIJK
LMNOPQRSTUVWXYZ[\]^_`abcdefghijklmnopqrstuvw
xyz{|}~

Monday, December 3, 2012

Getting git 1.8.0 to work with PuTTY/plink/pageant 0.62

I am successfully running the following things together:

  • Windows 8
  • Git-1.8.0-preview20121022.exe from here
  • PuTTY, plink, and pageant, all version 0.62, from here

I'm not sure if the Startup menu exists any more in Windows 8. To make pageant.exe run at startup and load my key, I used regedit to add a registry value under HKEY_CURRENT_USER\Software\Microsoft\Windows\CurrentVersion\Run. The value is a String, the name can be whatever, and the value should be something like:

"C:\Program Files (x86)\PuTTY\pageant.exe" "C:\your\private\key.ppk"

By default, the version of SSH that ships with msysgit does not try to access pageant. You have to configure git to use plink.exe instead. Lots of people on the internet will tell you that you must set the GIT_SSH environment variable to be the full path to plink.exe, but for some reason that wasn't working for me this time. I'm sure this is not optimal, but my solution was to move plink.exe to "C:\Program Files (x86)\Git\bin\ssh.exe", overwriting the original ssh.exe. (I saved a copy of the of the original ssh.exe just in case I need it later.)

Anyway, it works now so I can continue working on all of my favorite coding projects.

UPDATE: See my new and improved article entitled Git and PuTTY in Windows.

Monday, November 26, 2012

Orientation sensing with the Raspberry Pi and MinIMU-9 v2

The Raspberry Pi is an ideal platform for experimenting with inertial measurement units (IMUs). These IMUs are usually I²C devices, so it is straightforward to access them using the Raspberry Pi's I²C bus. The integrated 3D graphics on the Raspberry Pi are useful for visualizing the results.

I have made some software that allows you to connect the MinIMU-9 v2 from Pololu Robotics & Electronics to your Raspberry Pi and calculate the orientation of the IMU. I also wrote a visualization program that shows the results in 3D. Check out the demo in this video:

The software is open source and I have written a tutorial for it. The only items needed besides your Raspberry Pi setup are:

Soldering is required: the male header pins that come with the MinIMU-9 v2 need to be soldered in.

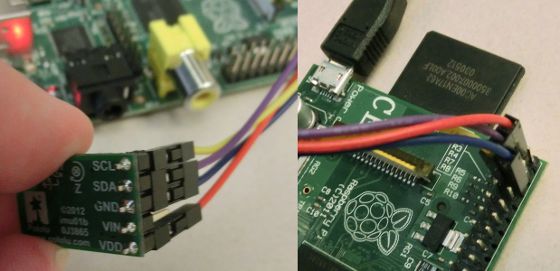
The MinIMU-9 v2 can be conveniently powered from the Raspberry Pi's 3V3 power line. The photos below show how to connect a MinIMU-9 v2 to a Raspberry Pi:

Wiring

The software consists mainly of two programs, both written in C++. The minimu9-ahrs program reads data from the MinIMU-9's sensors via I²C, calculates the orientation of the IMU, and outputs data to the standard output. Internally, it represents the orientation with a quaternion, but several different output options are available: direction cosine matrix, quaternion, euler angles, and raw sensor data. The ahrs-visualizer program reads direction cosine matrix data from its standard input and displays a 3D representation of the MinIMU-9 v2 using OpenGL. I also used libi2c, libpng, the Boost program_options library, and Eigen. There is a Python script that helps calibrate the magnetometer. For easy installation of the software, I have created Debian packages.

For more information, see the tutorial! I would love to see what people build with this, so please post comments below!

PIC18F14K50 errata: I was right all along

In March 2009 (3.5 years ago), I reported a problem with the PIC18F14K50 on the Microchip forum. This month, they finally added it to the errata list. This should somehow give me more credibility the next time I report a bug to a silicon manufacturer!

Tuesday, July 10, 2012

Atmel Studio bug caused by --Wl,--gc-sections

I have found a bug in Atmel Studio 6.0.1843 (with AVR Toolchain 8 Bit 3.4.663 - GCC 4.6.2) that results in RAM variables being placed starting at address 0x60 instead of 0x100 if the --Wl,--gc-sections flag is enabled and the .data section is empty. This makes the RAM variables overlap with memory-mapped SFRs, so they do not function properly.

You can follow these steps to reproduce the bug:
  1. Make a new project with the GCC C Executable Project template and select the ATmega328P. (I believe this bug affects other parts too.)
  2. In the project properties, check the "Garbage collect unused sections (-Wl,--gc-sections)" checkbox.
  3. Write the following in main.c:
    
    #include <avr/io.h>
    unsigned char foo = 0;
    int main(void)
    {
        while(1){ PORTC = foo++; }
    }
    
  4. Build the project.
Now look at the .map output file. You will see the following line, which indicates that foo is at address 0x60.
                0x00800060                foo
Unfortunately, address 0x60 is the location of WDTCSR, so putting a variable there does not work well.

The problem goes away if you ensure that the .data section is non-empty by making a static variable that is initialized to a non-zero value:
static void __attribute__((used)) workaround(void)
{
    static volatile unsigned char w = 1;
    w++;
}
I believe that Atmel Studio is affected by bug #13697 from GNU binutils.

I hope that the next version of Atmel Studio comes with a patched or updated binutils that does not suffer from this problem. I have reported the bug to Atmel.

Update 2012-07-18: A member of the Atmel AVR Toolchain Team has responded to my bug report. He said: "Thanks. We will have this fix available with our next release."